|
Accuracy
and Consistency in Measurements
1.4.1 Accuracy
1. ___________
of a measurement is how close
the value of a measurement
to the ____________ value.
2. The level of accuracy is related to the
relative error.
3. An error is a between the measured value and the actual
value .
4. Accuracy can be improved by : -
(a) repeated readings are taken and the
average value is calculated
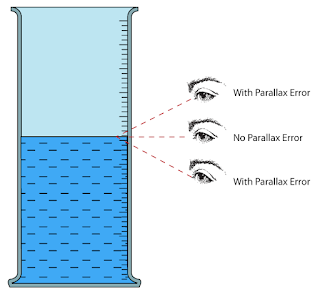
(b) avoid parallax errors
(c) avoid zero errors
(d) use measuring instruments with a higher
accuracy.
For example, a vernier callipers is more accurate than a ruler
| |||||||||||||||||||||
1.4.2 Consistency
1. / Precision of
an instrument is the ability of the instrument
to measure a quantity with little or
no deviation among measurements.
2.. A measurement is considered
consistent will have a relative
deviation or no deviation from
the average value .
3. A deviation is a difference between a _______________value and its
average value .
4. average
deviation = Total deviation
__________________
number of value taken
5. relative
deviation = average deviation x 100
%
______________
average value
6. Consistency can be improved by
(a) eliminating parallax errors
(b) exercising greater care and effort when
taking readings.
(c) using an instrument which is not defective.
7.
Comparisons between
consistency and accuracy by
considering a target.
| |||||||||||||||||||||
Example:
A student
used vernier callipers to measure diameter of a glass rod. The table below
shows the readings.
Relative deviation = ( 0.01 / 2.242) x 100%
= 0.45 %
|
|||||||||||||||||||||
|
1.4.3
Sensitivity in Measurements
1.
Sensitivity of an instrument is its ability to detect a small change in the
quantity to be measured.
2. A
measuring instrument that has a scale with a smaller divisions is more
sensitive .
3.
Measuring instruments.
|
|
1.4.4
|
Errors in Measurements
|
|
|
1. An
error is the difference between the measured value and
the actual
value.
2. There
are two main types of errors in measurements,
A.
systematic errors
B.
random errors.
A. Systematic errors
i.
The error in calibration of instrument which makes the instrument
defective. (We must examine the instrument carefully
before using
them)
ii.
________ error which means the pointer of the instrument
does not
return to
zero when not in use. ( Zero error can be corrected by
compensating the readings)
iii.
A problem which persists throughout
the experiment such as
repeated error in reaction time
and wrong assumption.
Systematic errors will lead to decrease
in
|
|
|
B. Random errors
i.
Arise from unknown and unpredictable variations in condition, and
will produce a different error every
time you repeat the experiment.
ii.
May be due to:
(a) personal error (human limitations of sight and touch)
(b) lack of sensitivity ( instrument does not respond / indicate
insignificant or small
change )
(c) natural errors ( wind , temperature, humidity, refraction,
magnetic
Field or gravity )
(d) wrong
technique ( applying
excessive pressure when
turning a micrometer screw
gauge )
iii.
Can be minimized by repeating
the measurement several times
and taking the average (mean) of
the reading .
iv.
Parallax error
An error in reading a measurement
because an observer’s eye and
the pointer are not in a line
perpendicular to the plane of the scale .
(the eyes of the observer must be align and perpendicular to the scale of
measuring instrument)
|


Thanks a lot;)
ReplyDelete